Texting Configuration & Data Prep
Before Clients start texting, they will need to spend some time to configure what type of texts they want to send, the verbiage that is included on them, and setting up contacts to receive texts.
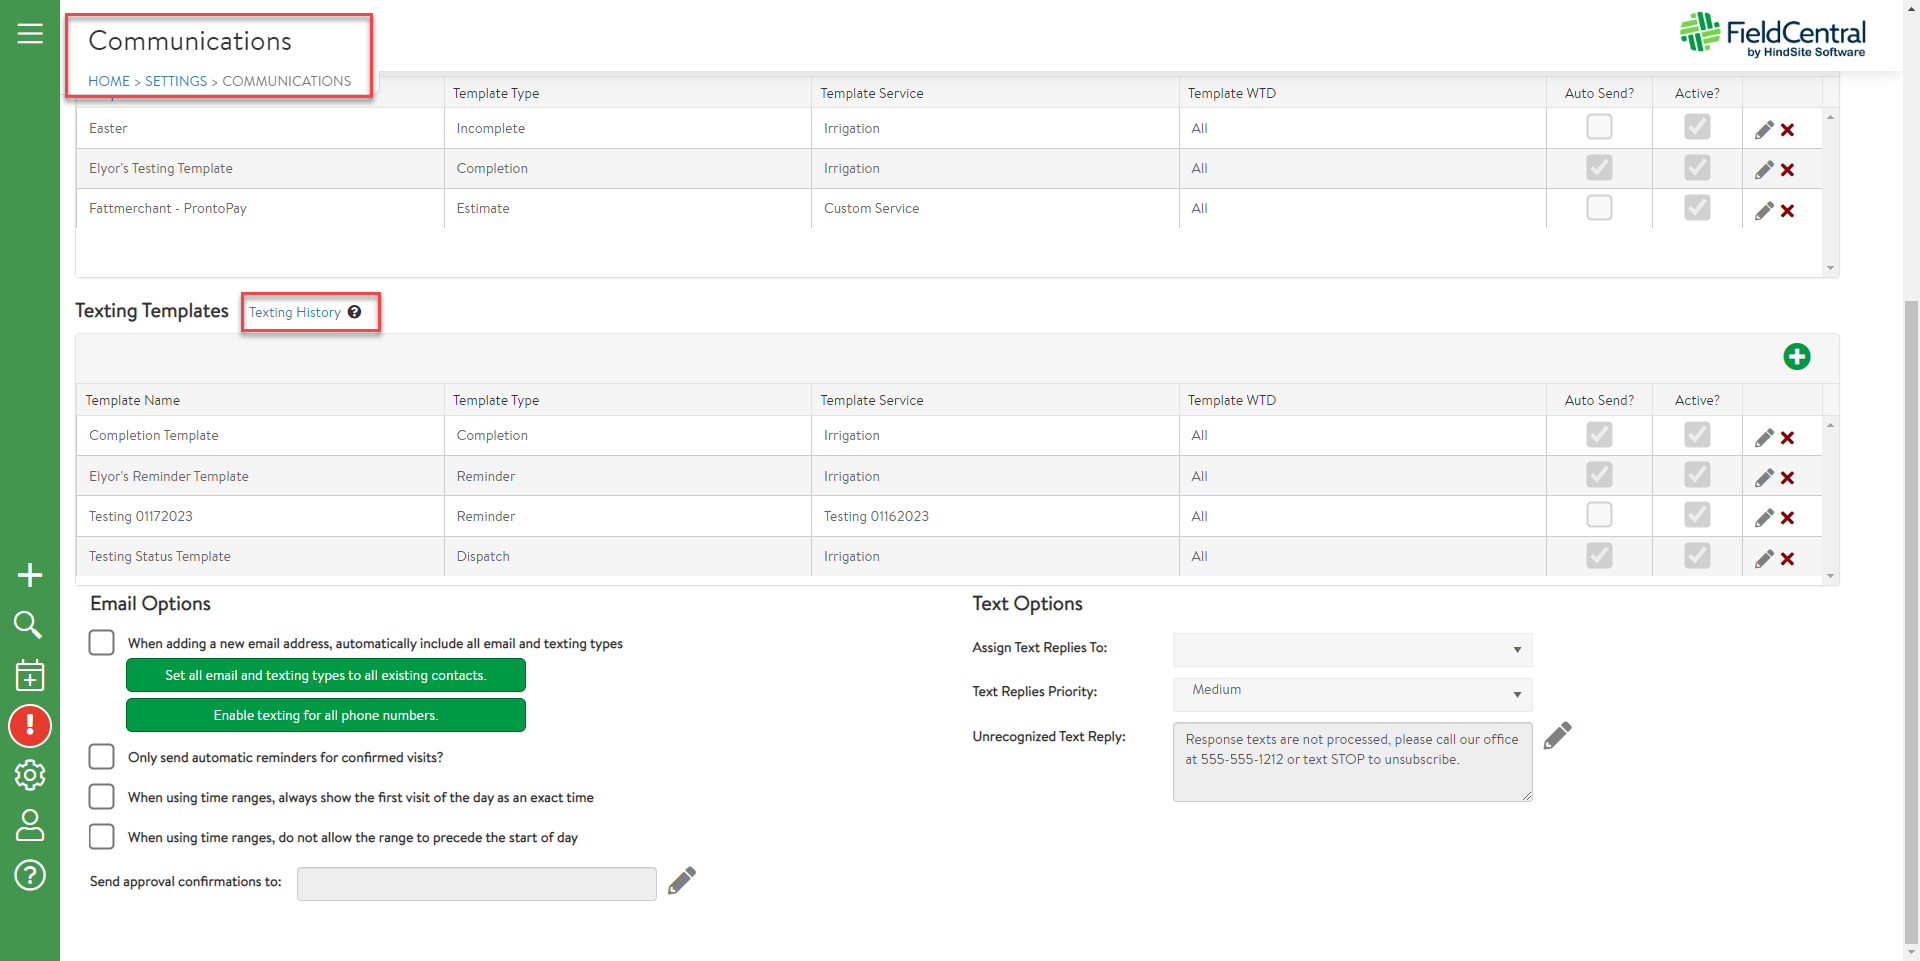
Texting Templates
Templates are used to create a collection of pre-configured text messages to make it easier to send automated, but personalized texts to the receiver. Templates are attached to events around a Visit, labeled in the system as ‘Text Types’, which are used in the given text to be sent: Reminder, Dispatch, & Completion. Unique text messages can also be created for each Service and Service Category combination, enabling users to create a large number of targeted texts.
A template can be given the following properties:
-
Template Name - Unique name that is used to distinguish one text template from another. These values are only used within FC and are not seen by the end Customer.
-
Active (Y/N)
-
Y = Text message can be sent using this template
-
N = Text message will not be sent using this template, and will not appear as an option when attempting to manually trigger a text
-
-
Text Type - Standard events that occurs around a Visit (i.e. Reminder, Dispatch, Completion & Generic)
-
Reminder, Dispatch & Completion based templates can be configured to auto-send based on system/user activity in addition to manually-triggered texts
-
Generic Text Types are only available for manually-trigged texts
-
-
Service - Assign a specific service to the given text to make the message even more unique to that service
-
All Services (Y/N) - Send the text to all given Services under the given Service selected
-
Services- Assign a specific Service under the given Service Category selected, to make the text message even more unique to that Service
-
Auto Send - Automatically send the text when FC detects the given configured event has occurred (i.e. the combination of Text Type, Service Category & Service). See ‘Sending Texts’ section below for details on what triggers auto send texts.
-
Message - The message to be sent for the given template configuration (i.e. the combination of Text Type, Service Category & Service)
-
Variables - The message can be configured with a number of variables to personalize the given message. The list of variables are similar to the ones used for email, with a few exceptions (e.g. Confirmation, Techpic, Survey)
-
-
Reminder Template Only: Number of days before scheduled visits to send automatic reminder - Determines how many days before a visit that an automated Reminder text is sent.
To access Texting Templates, go to Settings > Communications. Users can choose to Add, Edit or Delete templates.

If a user chooses to Add or Edit a template, they will see the following modal with the fields mentioned above:

The ‘Reminder’ Texting Template has an additional field to fill out: ‘Number of days before scheduled visits to send automatic reminder’.

The variables are entered into the ‘Message’ field using the available Connect Variables

Unrecognized Text Reply
While not encouraged, Customers may respond to a given text sent from FC. Two-way chat is not yet available in FC, but we will still log the text (see “Texting Log” section below) and FC will send an automated response back to the Customer to alert them that text chats are not monitored. This auto-response can be configured in the Settings > Communications area of FC under the ‘Unrecognized Text Reply’ area.

Should a Customer send a text, the system will show and log an alert in the system. This will create a Reminder in the system. Clients can choose to configure which User the Reminder will be assigned to, and they can choose the Priority of the Reminder. Using this configuration, the Unrecognized Text Reminder will follow similar rules as other Reminders (e.g. toast will show up on the screen, record will show up in the Reminders list, etc.).

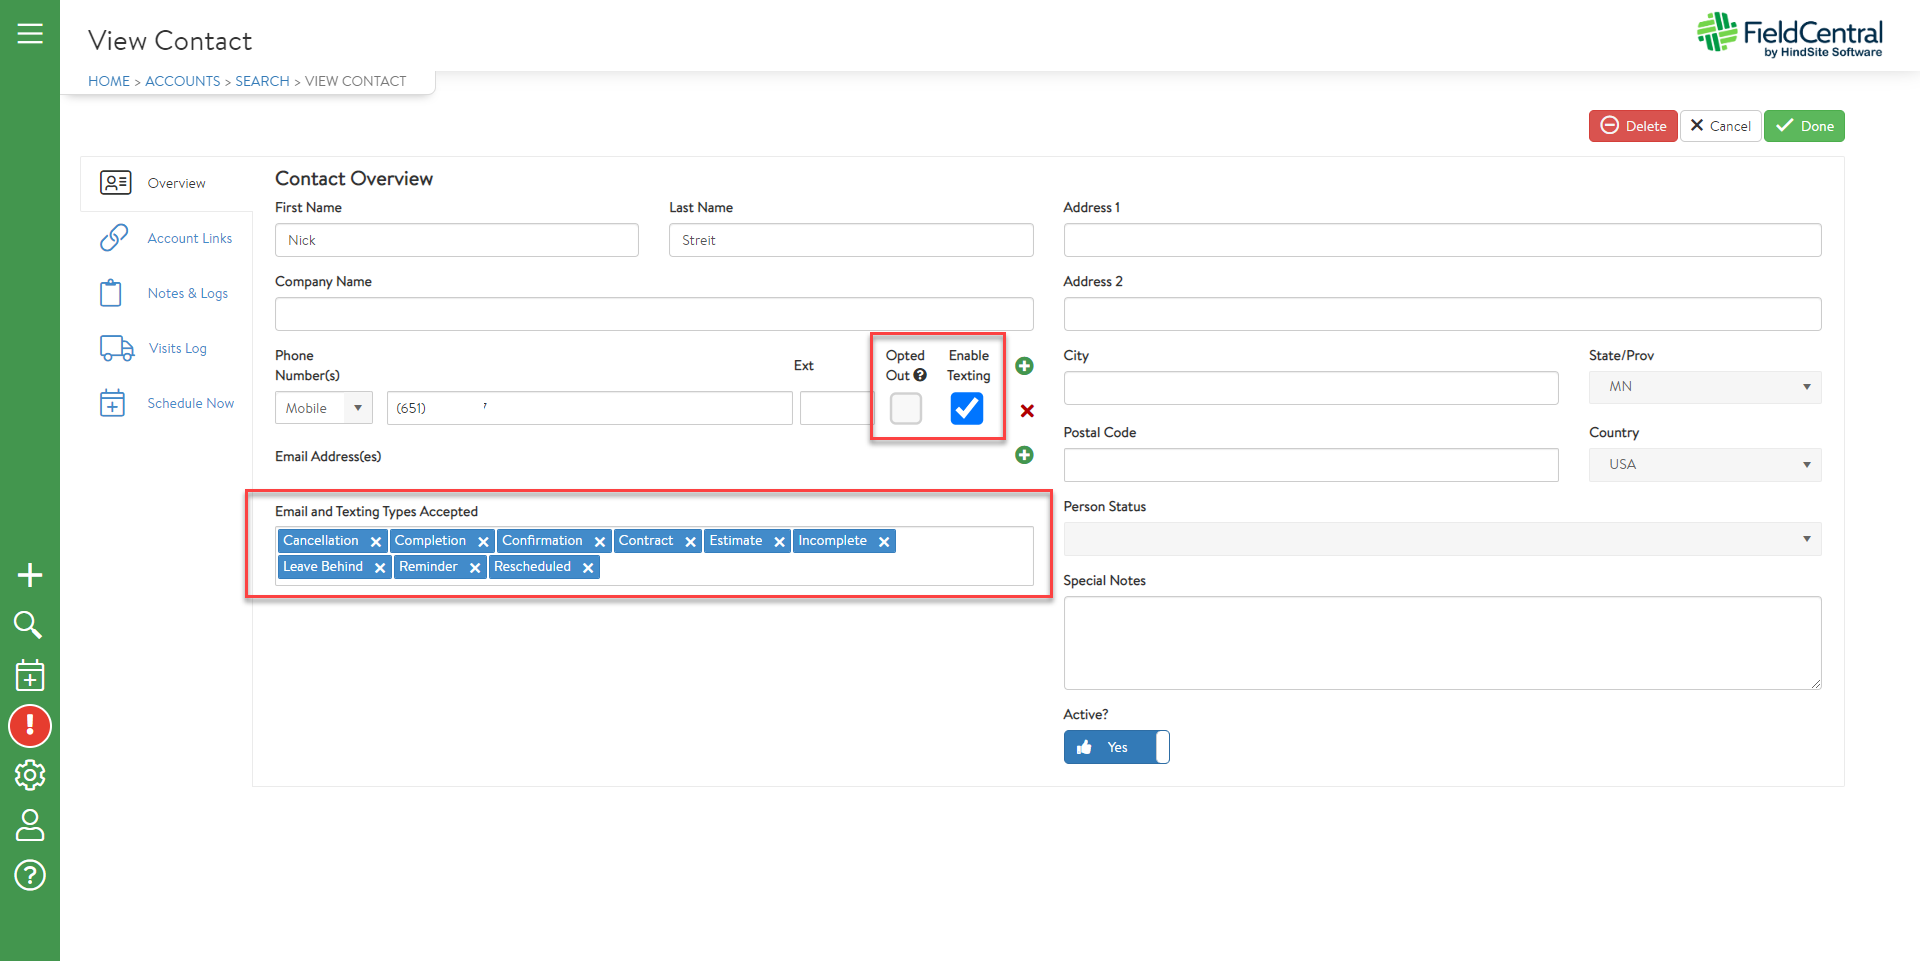
Contacts: Enable Texting
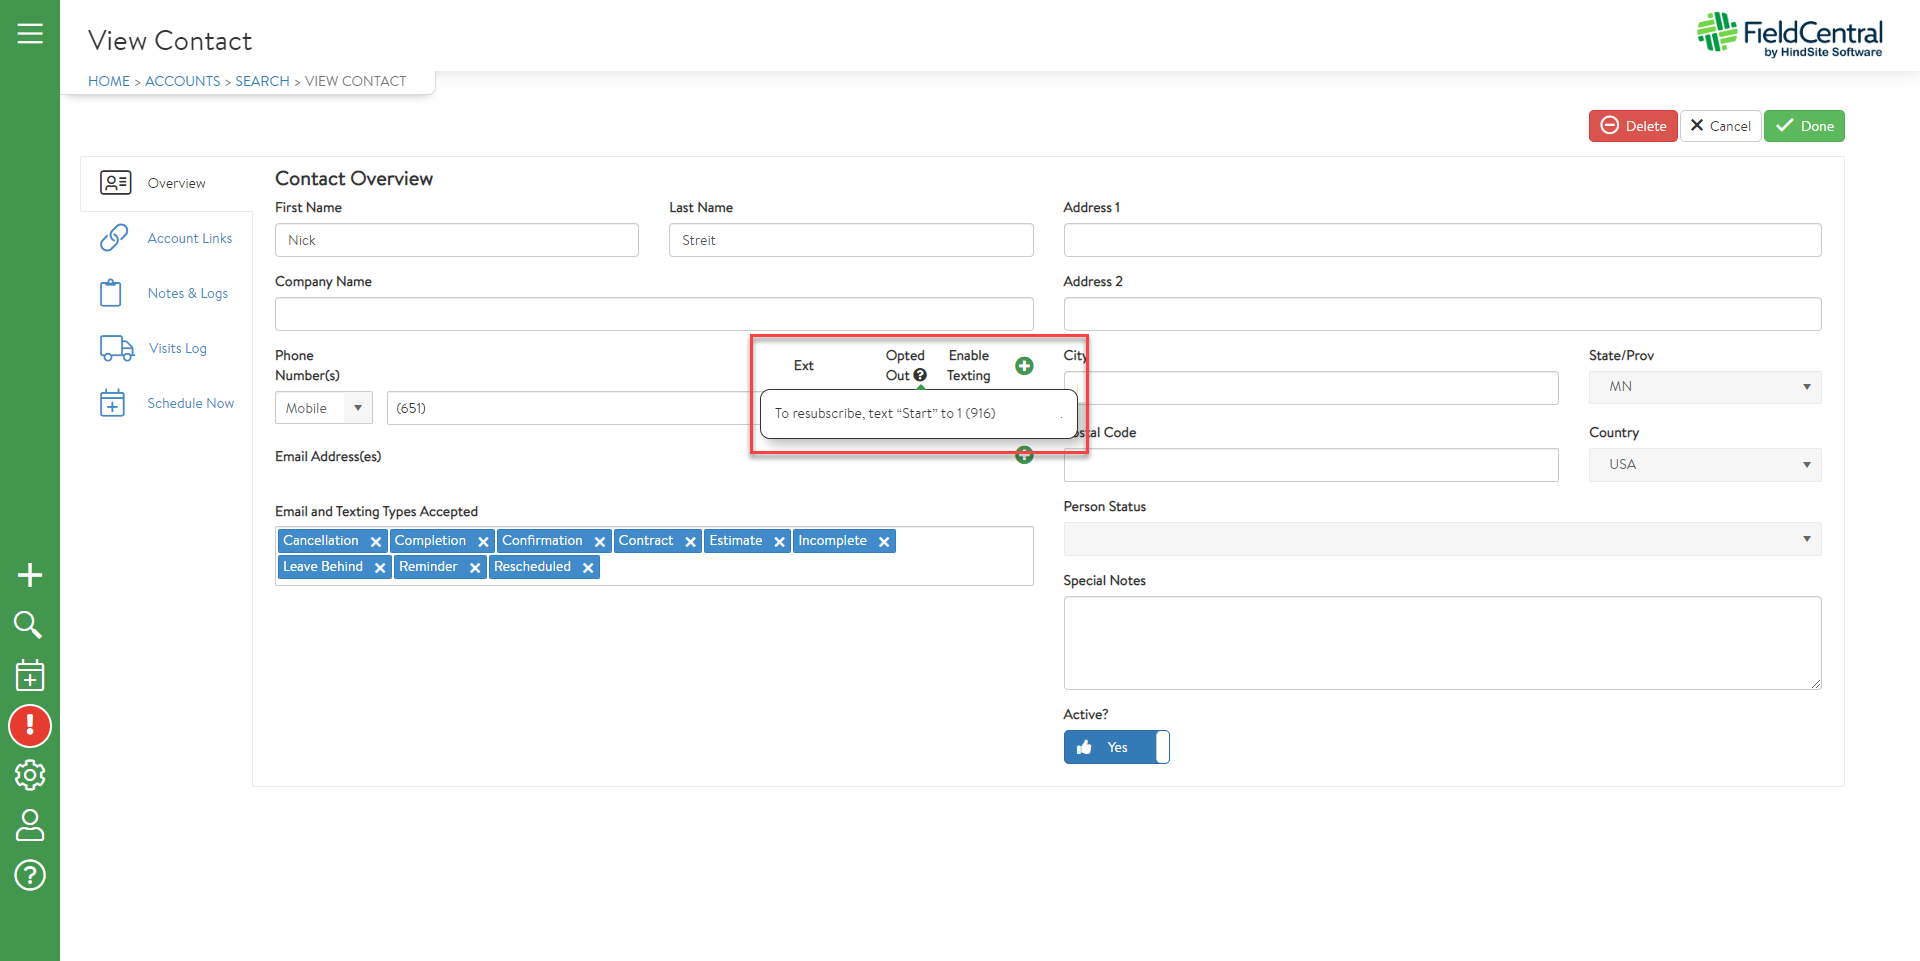
Each Contact that should receive texts will need to have the ‘Enable Texting’ option selected in order to receive texts along with the corresponding assignment of ‘Email & Texting Types Accepted' options. Should a Customer opt out of texting by replying ‘stop’ to the text, or the number is not a number attached to a mobile phone (e.g. land line), then the ‘Opted Out’ checkbox will be selected. Due to legal reasons, a Customer must be the one to opt back into texting, and the tool tip describes how to accomplish this. Customers must manually text ‘Start’ to your texting number, which is shown in the tool tip as a reminder.
For Clients that already have a large number of Contacts already in their system, and they want to automatically enable every phone number for texting, there is a button to enable texting at once. This should be used with caution as all Contact records will be updated at once. 
Sending Texts (Automated & Manual)
Automated Text Messages
Texting Templates that are marked as ‘Auto Send’ will send out text messages by FieldCentral based on unique triggers for each Texting Template Type (e.g. reminder, dispatch vs. Completion).
-
Reminder
-
The reminder text (and email) timer is run once every hour, from when the Monitor Service is started. That timer looks for visits that are over 24 hours from the current time and less than X days from the days specified in the template (i.e. 'Number of days before scheduled visits to send automatic reminder' field).
-
NOTE: Users must enter a value of 1 or larger to ensure texts are sent out. If 0 is entered, texts will NOT be sent the day of the visit
-
-
Dispatch
-
Sent upon receiving the "drive time/dispatch" ping from the Field Application when the technician clicks "Driving". Drive time must be enabled in the crew options.
-
-
Completion
-
Sent when a completed Visit transaction is uploaded to FieldCentral. This will only occur when a Field Application user marks a Visit as Complete and then web synchs to update FieldCentral.
-
Manually Sending Text Messages
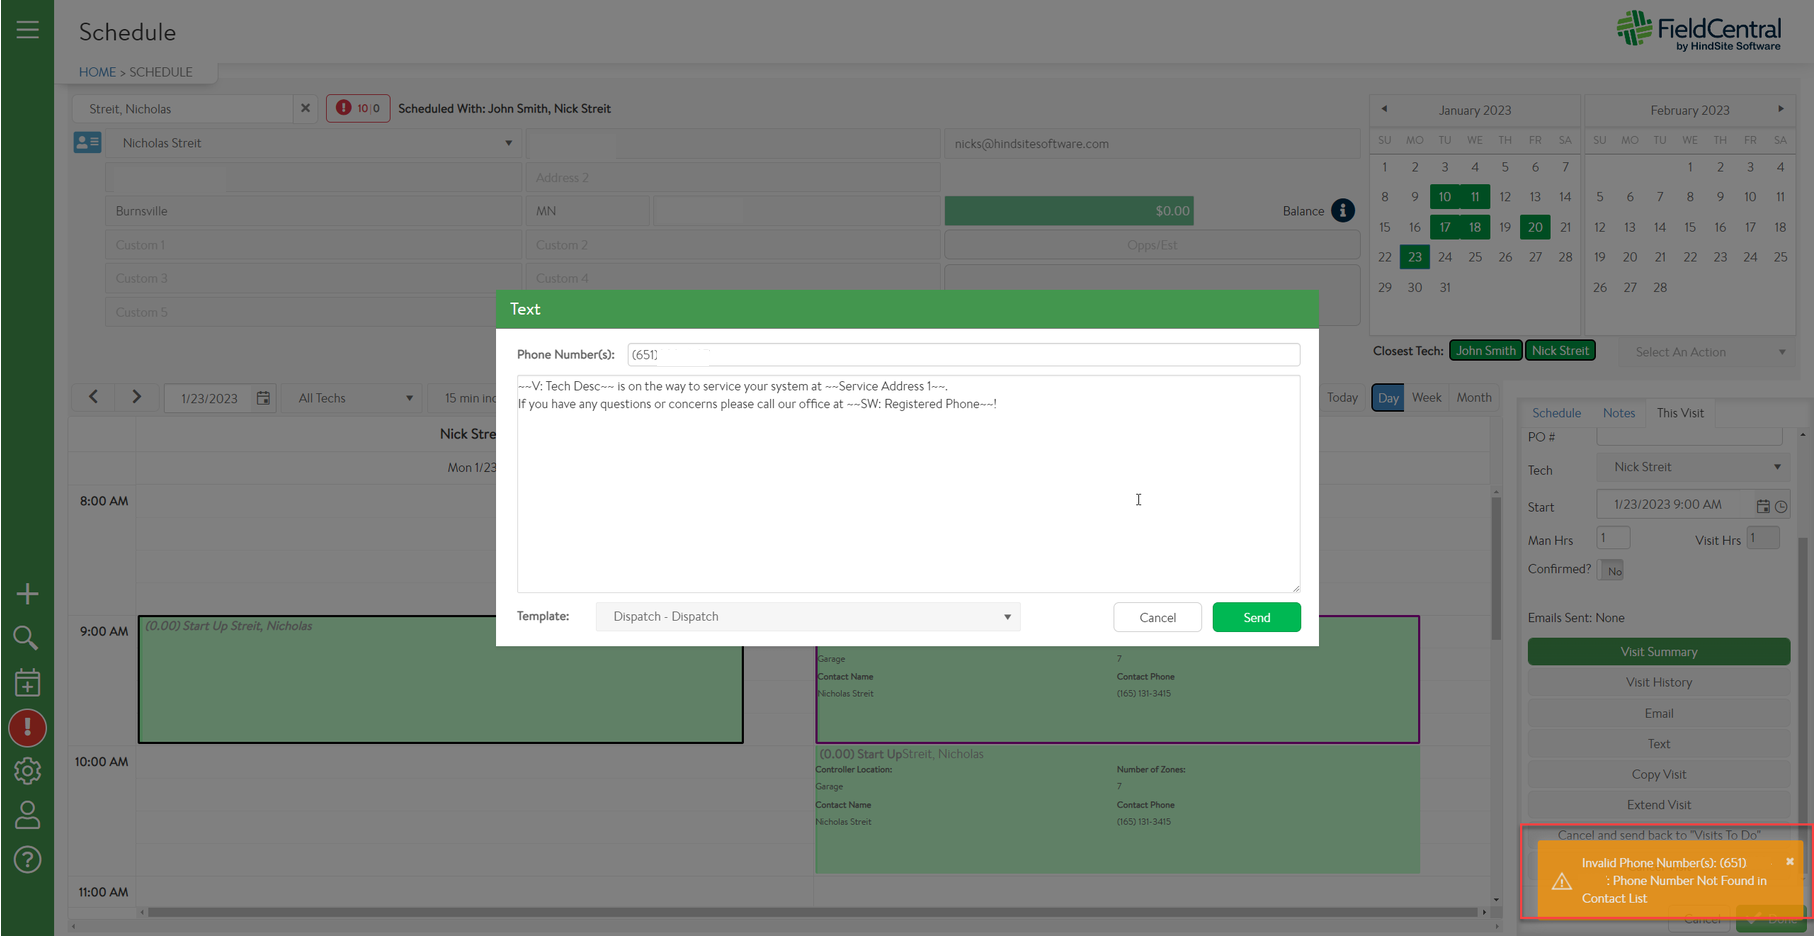
Admin users can choose to manually send text messages through FieldCentral. When selecting a specific visit on the Schedule, users can click the ‘Text’ button to start the process.
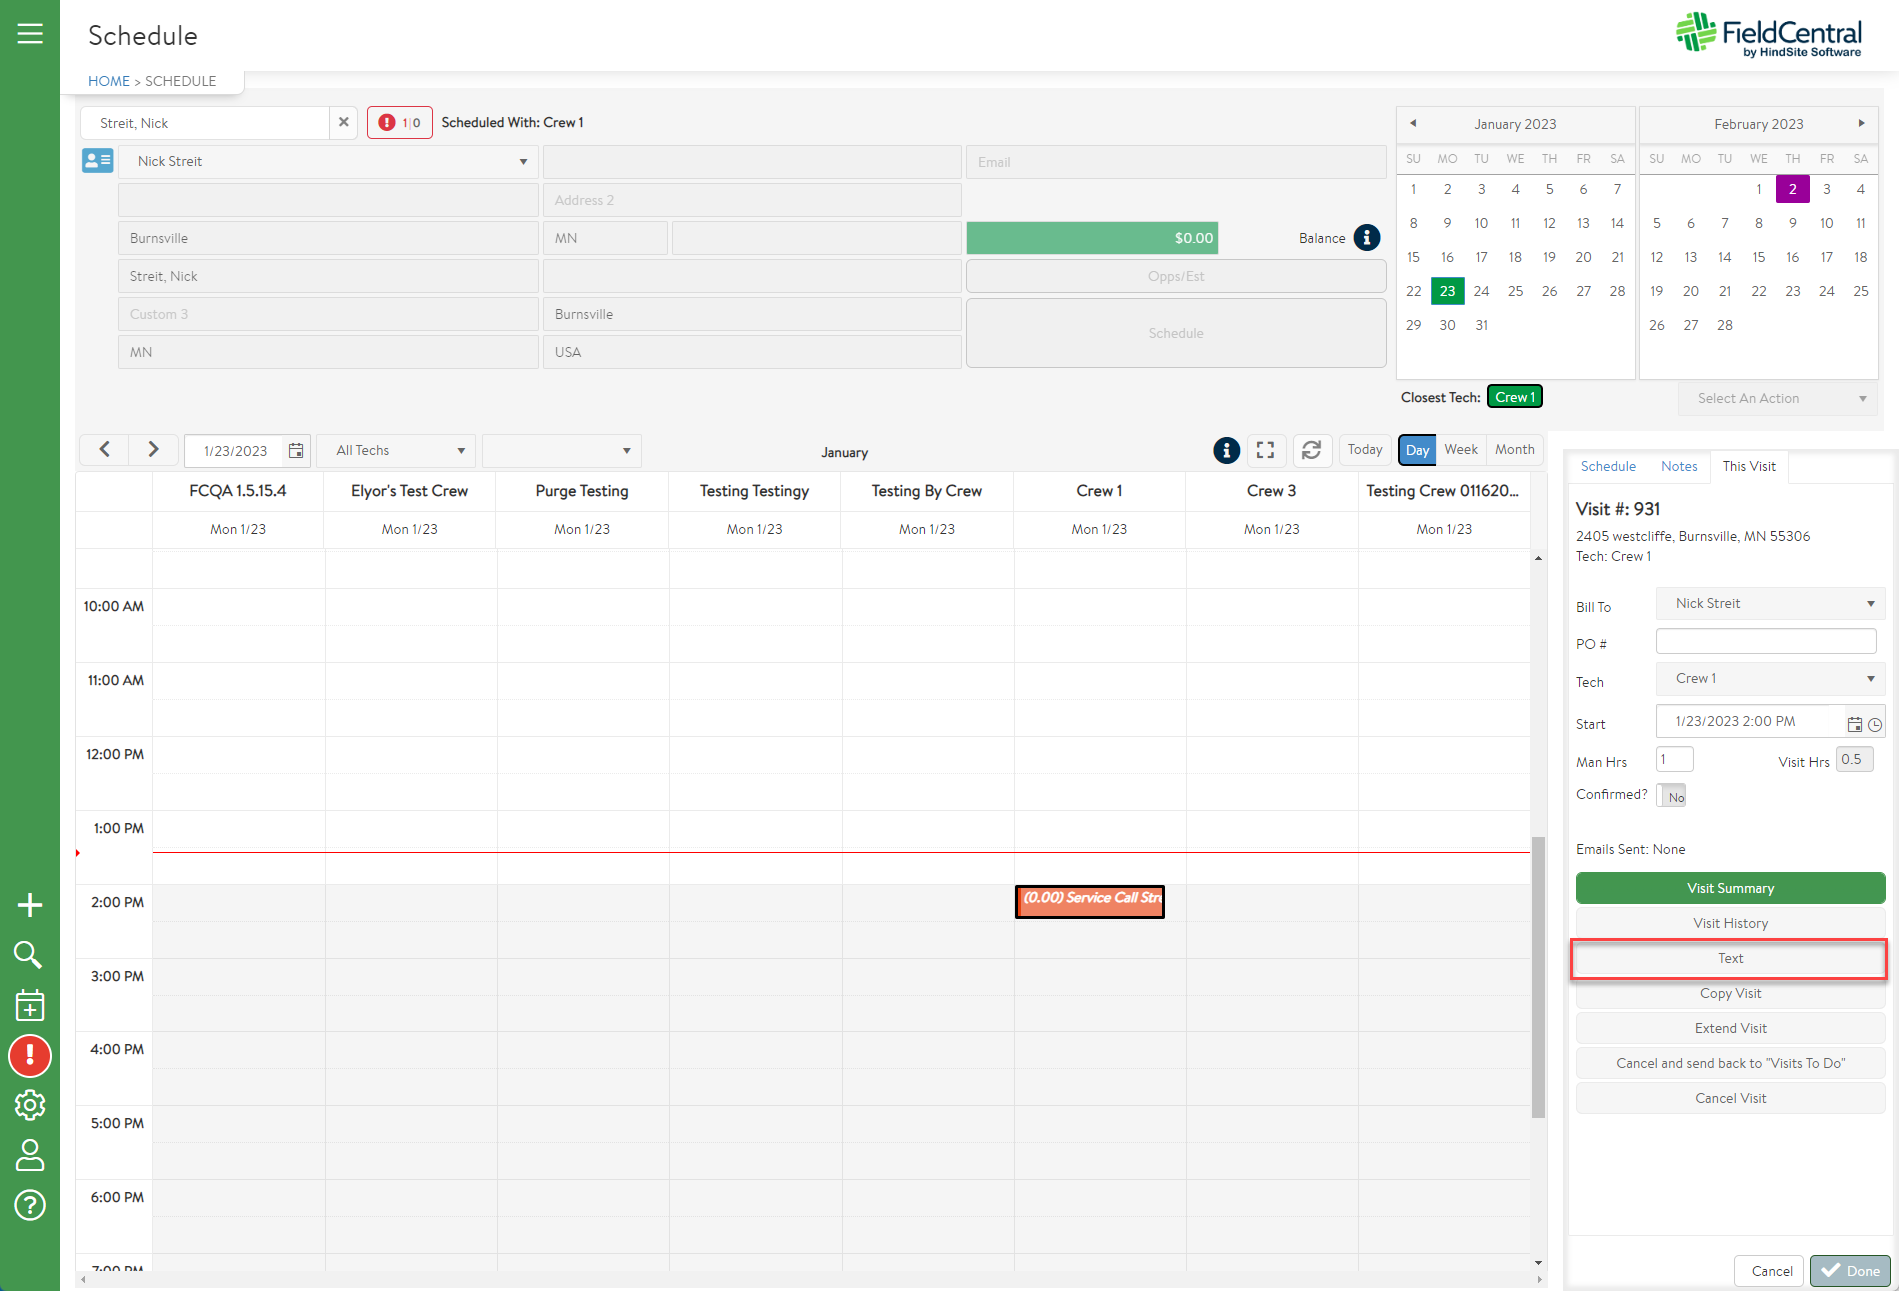
The following Text modal will prepopulate the ‘Phone Number(s) with the Contact’s phone number and a blank text message window. Users can choose to prepopulate the text box with a pre-configured Texting Template. When hitting the ‘Send’ button, the text message will be sent to the corresponding Phone Numbers.
NOTE: Users can override the Phone Number or text in the text box to send texts.
NOTE: Additional number can be added, with a ';' character separating the numbers (e.g. “555-555-1212;555-555-3232”). 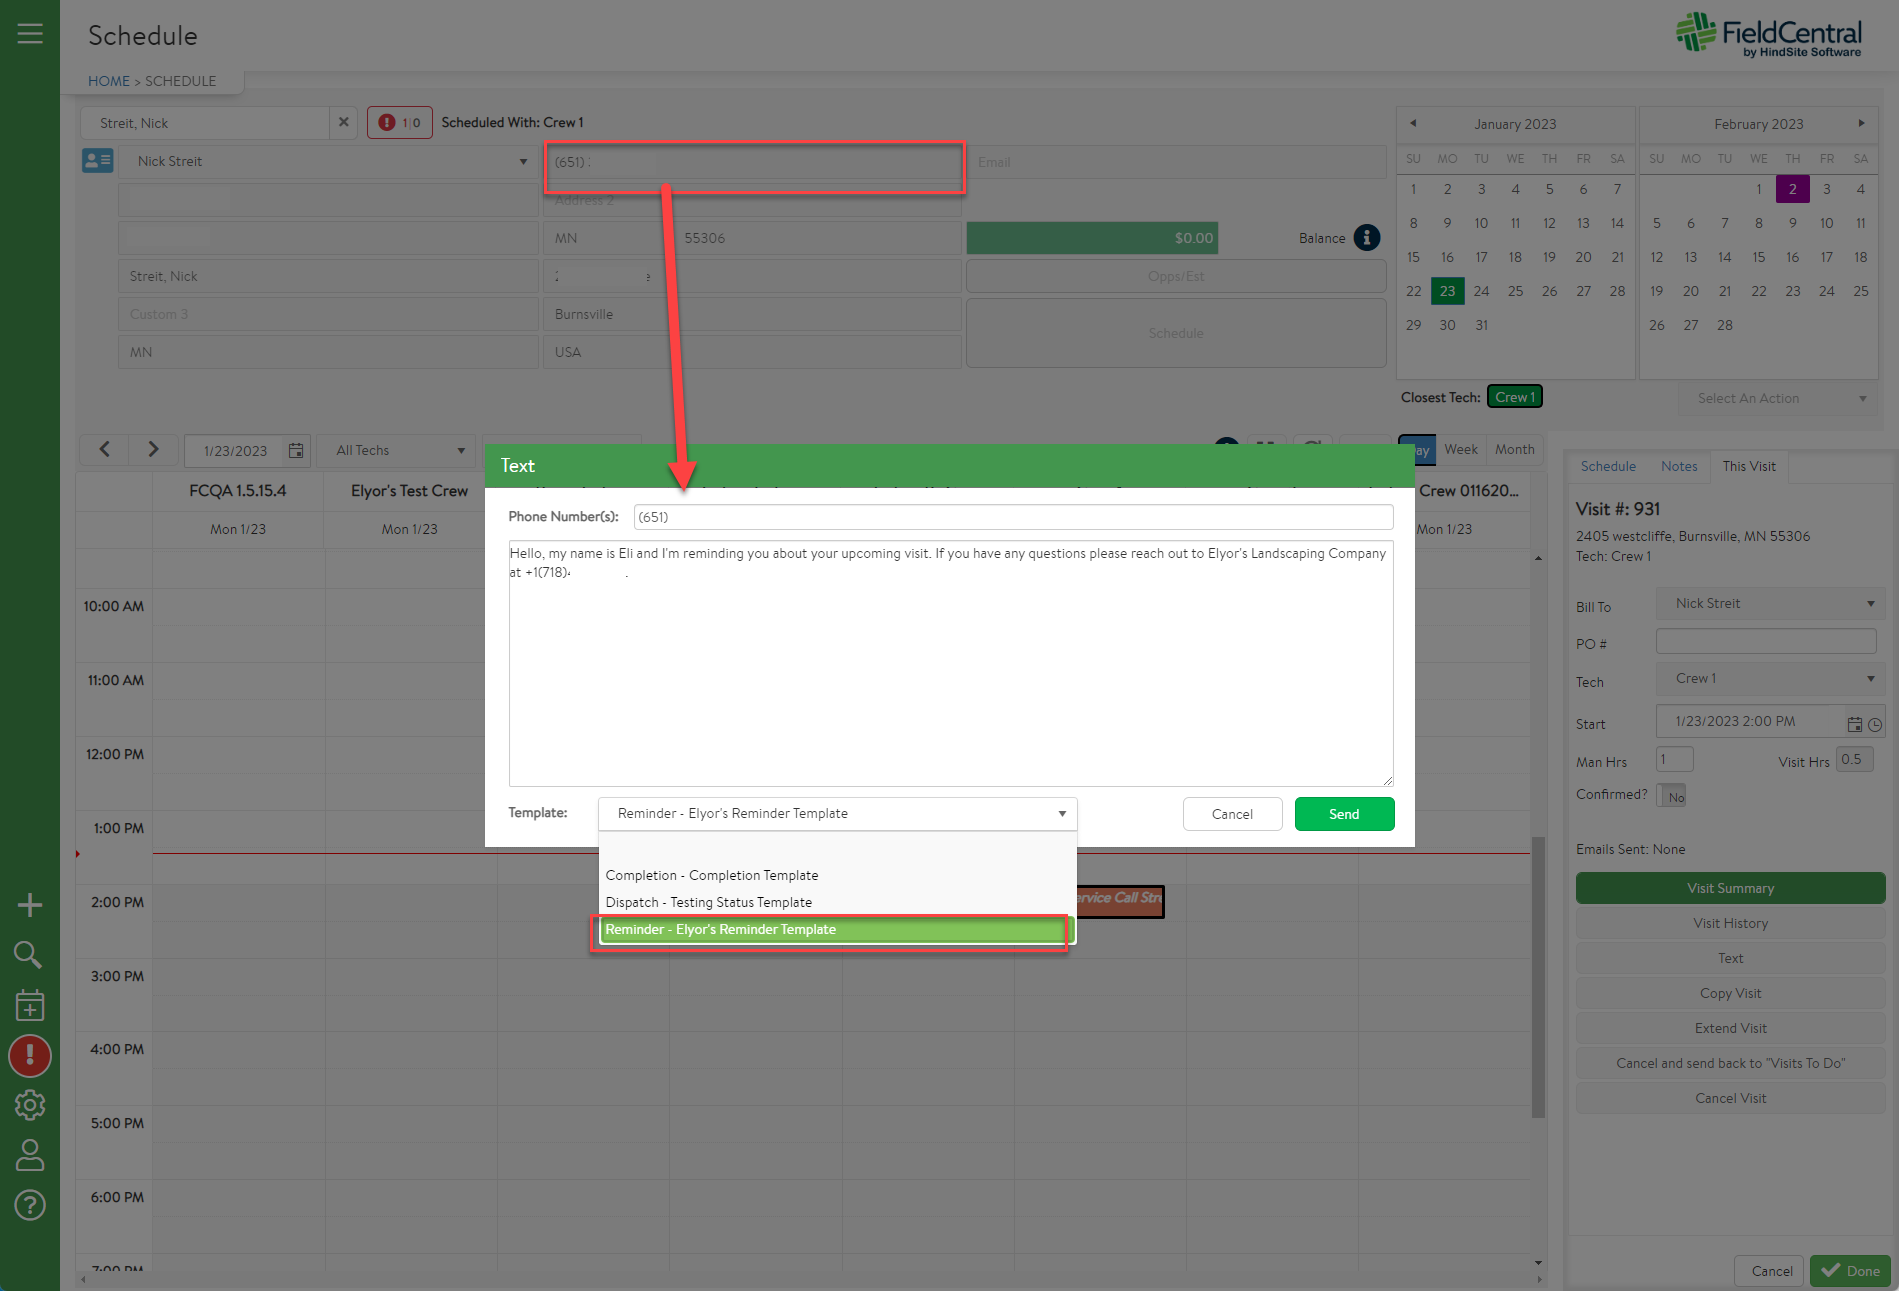
NOTE: Phone numbers that do not exist within FieldCentral will not be sent texts, and the following toaster will be presented to the user.
Customer Opt In/Out of Texting
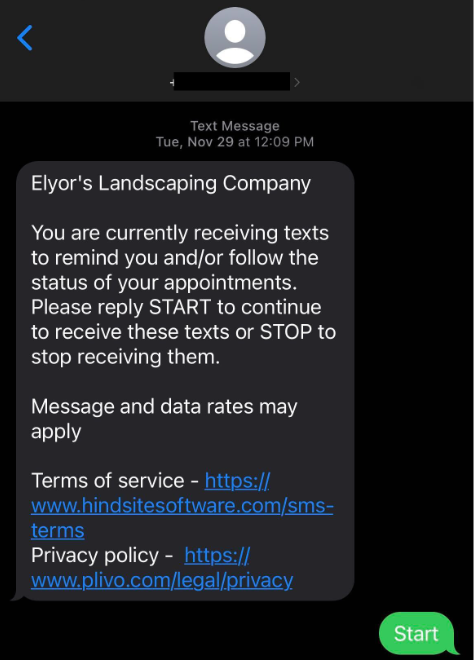
When a customer receives their first text, they will first receive a text to confirm that they have been opted into receiving texts. The customer must actively reply ‘START’ to the text in order to receive subsequent text messages. If they reply ‘STOP’, they will be opted out of texting, and their Contact record will be updated to not receive texts. Assuming they reply ‘START’, then the first text will be sent over and subsequent texts will be sent without the opt in/out message.
NOTE: The response is not case sensitive, meaning users can put in ‘start’ and still opt into texting.
Opting Back In After Opting Out
If a Customer had opted out of texting by replying ‘stop’ to the text, or the number is detected by our systems to not be a mobile phone (e.g. land line), then the ‘Opted Out’ checkbox will be selected. Due to legal reasons, a Customer must be the one to manually opt back into texting, and the tool tip describes how to accomplish this. Customers must manually text ‘Start’ to the Client’s texting number, which is shown in the tool tip as a reminder.
Texting History & Logging
Texting Log
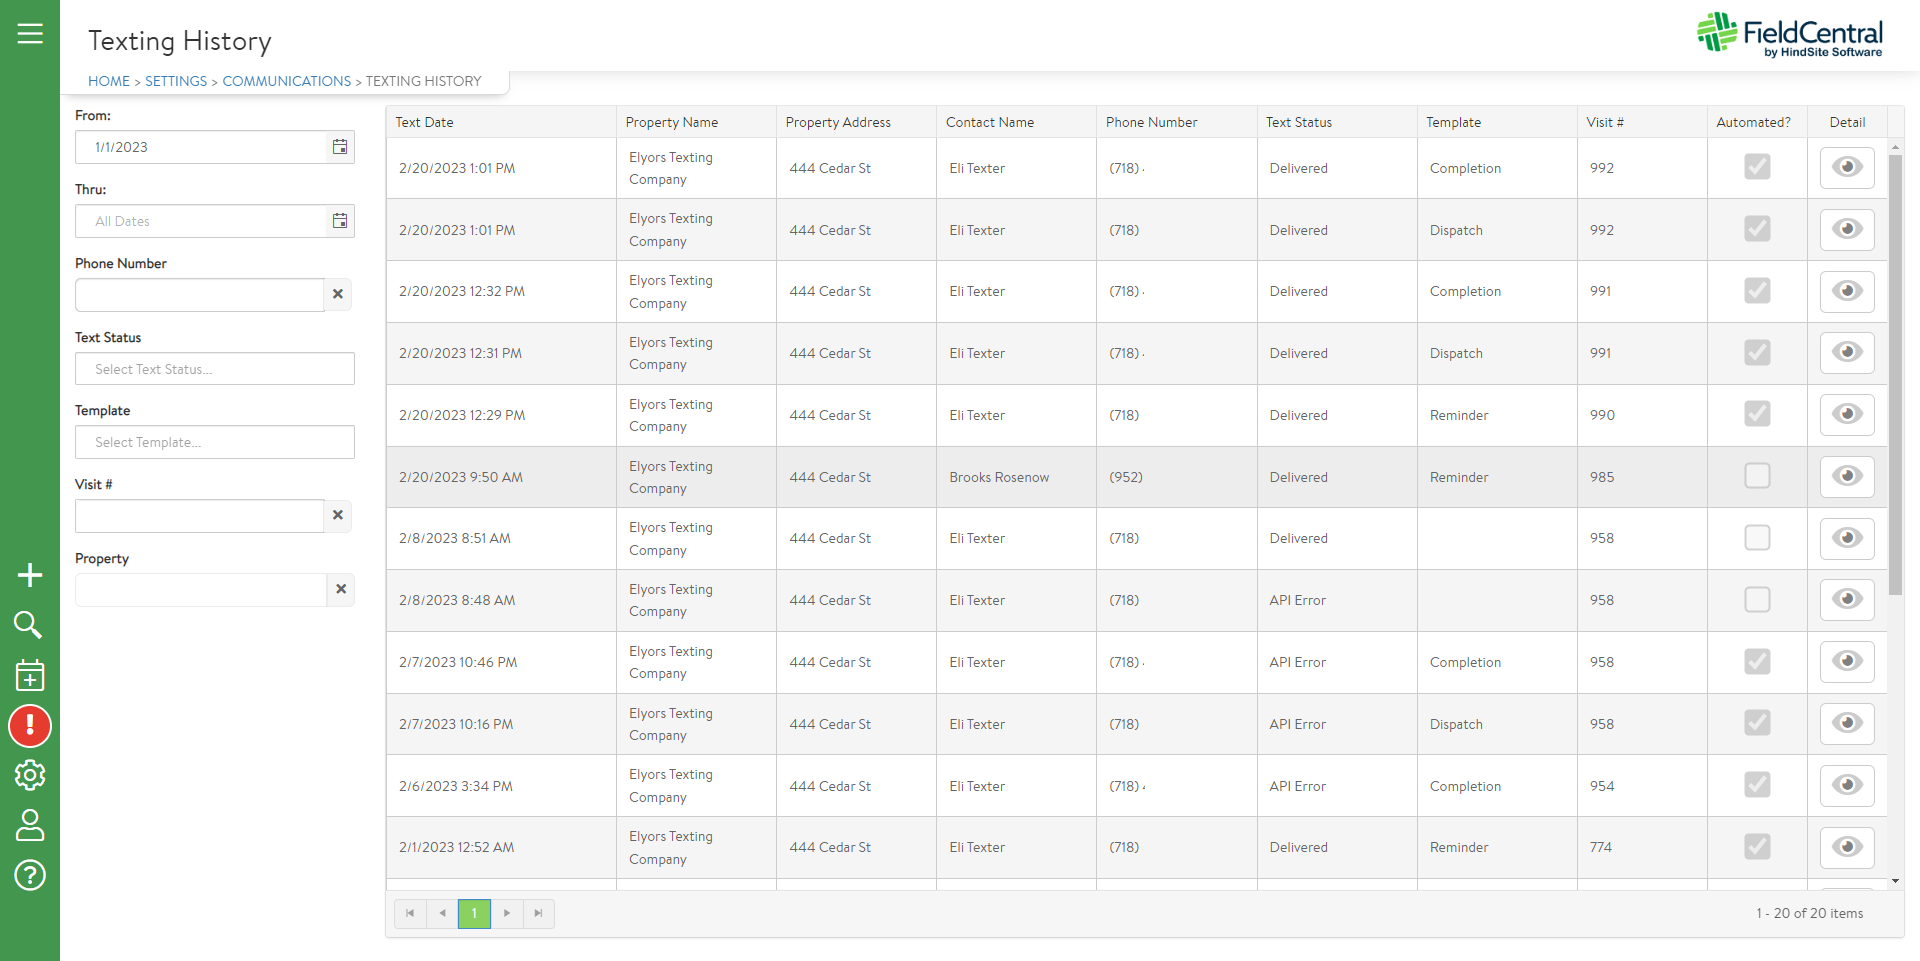
Users have access to the texting log in order to review or troubleshoot texting behavior. This is accessible through the Settings > Communications area and clicking on the ‘Texting History’ link next to the Texting Templates section.
Once on the Texting History page, users can filter text records based on the following fields.
NOTE: The filters are combined together to filter out records (i.e. combined via AND logic)
-
From & Thru - Pull text transactions/records between the selected date range
-
Phone Number - Enter a specific phone number that a text was sent to. NOTE: You can use partial/wild card match - for example, type ‘612’ to find any phone numbers that contain ‘612’
-
Text Status - Select from a pre-defined set of text status values. Users can select 0, 1 or many values to filter upon.
-
Not Sent - Message was attempted to be sent from FieldCentral but never made it out of the system, much less to the intended recipient
-
API Received - Text made it out of the FieldCentral system and was pushed to the Texting API, and we are waiting for the text to be processed.. If a text message stays in this status for a long period of time, contact HindSite for troubleshooting. This lets HindSite know that the text was successfully pushed to the Texting API, but did not process further.
-
API Error - The API had an internal error processing the text. The reason may be a database, 3rd-party system, or other misc error. The exact error message should be in the error_log table for the Texting Listener application. If this occurs, contact HindSite for troubleshooting.
-
Queued - 3rd-party system status that represents the text is queued to be sent from the 3rd-party system to the intended recipient. If a text has an issue in this status, HindSite would need to log into the 3rd-party to investigate.
-
Sent - 3rd-party system status that represents that the text was sent out from the 3rd-party system. If a text has an issue in this status, HindSite would need to log into the 3rd-Party system to investigate.
-
Failed - 3rd-party system status that an error occurred. If a text has an issue in this status, HindSite would need to log into the 3rd-Party system to investigate.
-
Delivered - The text was successfully sent to the intended recipient.
-
Reply - A message received from the recipient (i.e. the end user replied to a text sent from FieldCentral.
-
-
Template - Messages that were sent using the selected Texting Template. Users can select 0, 1 or many values to filter upon.
-
Visit # - Messages that were sent against a given Visit.
-
Property - Messages that were sent against a given Property.
The resulting list will show the valid texting records for the given filter(s) applied. There is an additional field in the results table that helps to indicate if the text was sent via the Automated process vs. manual.
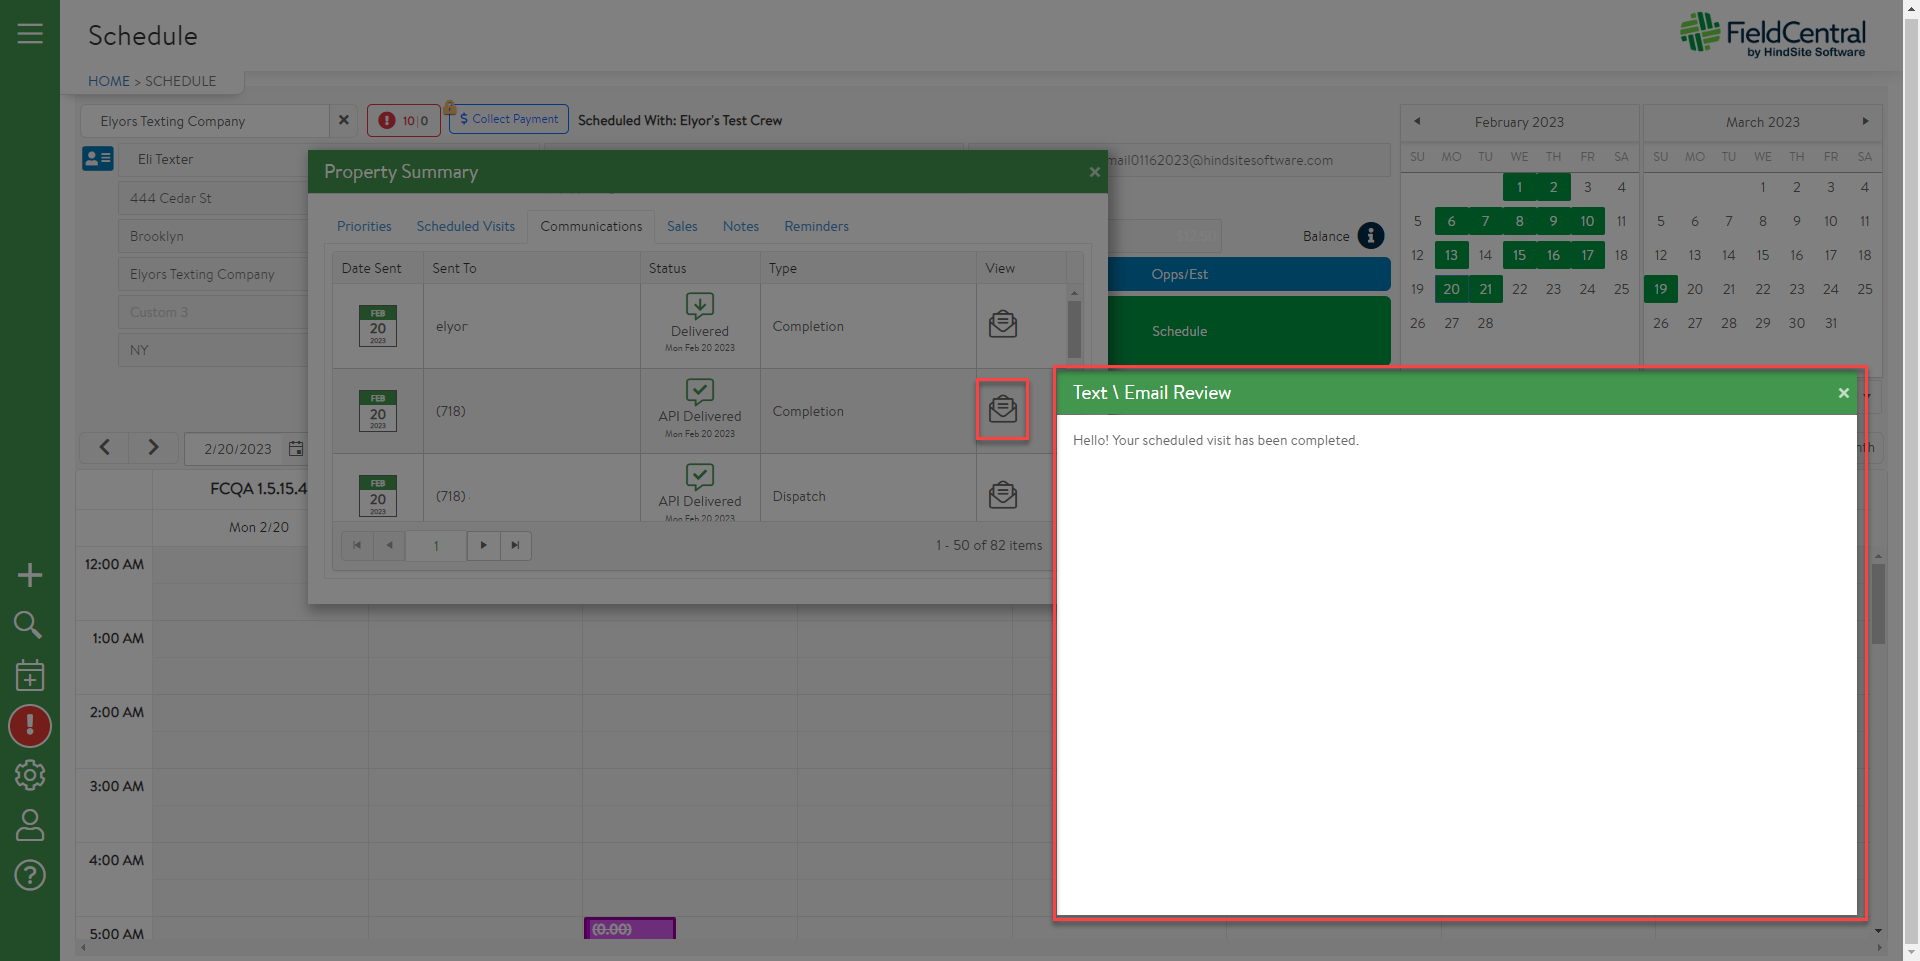
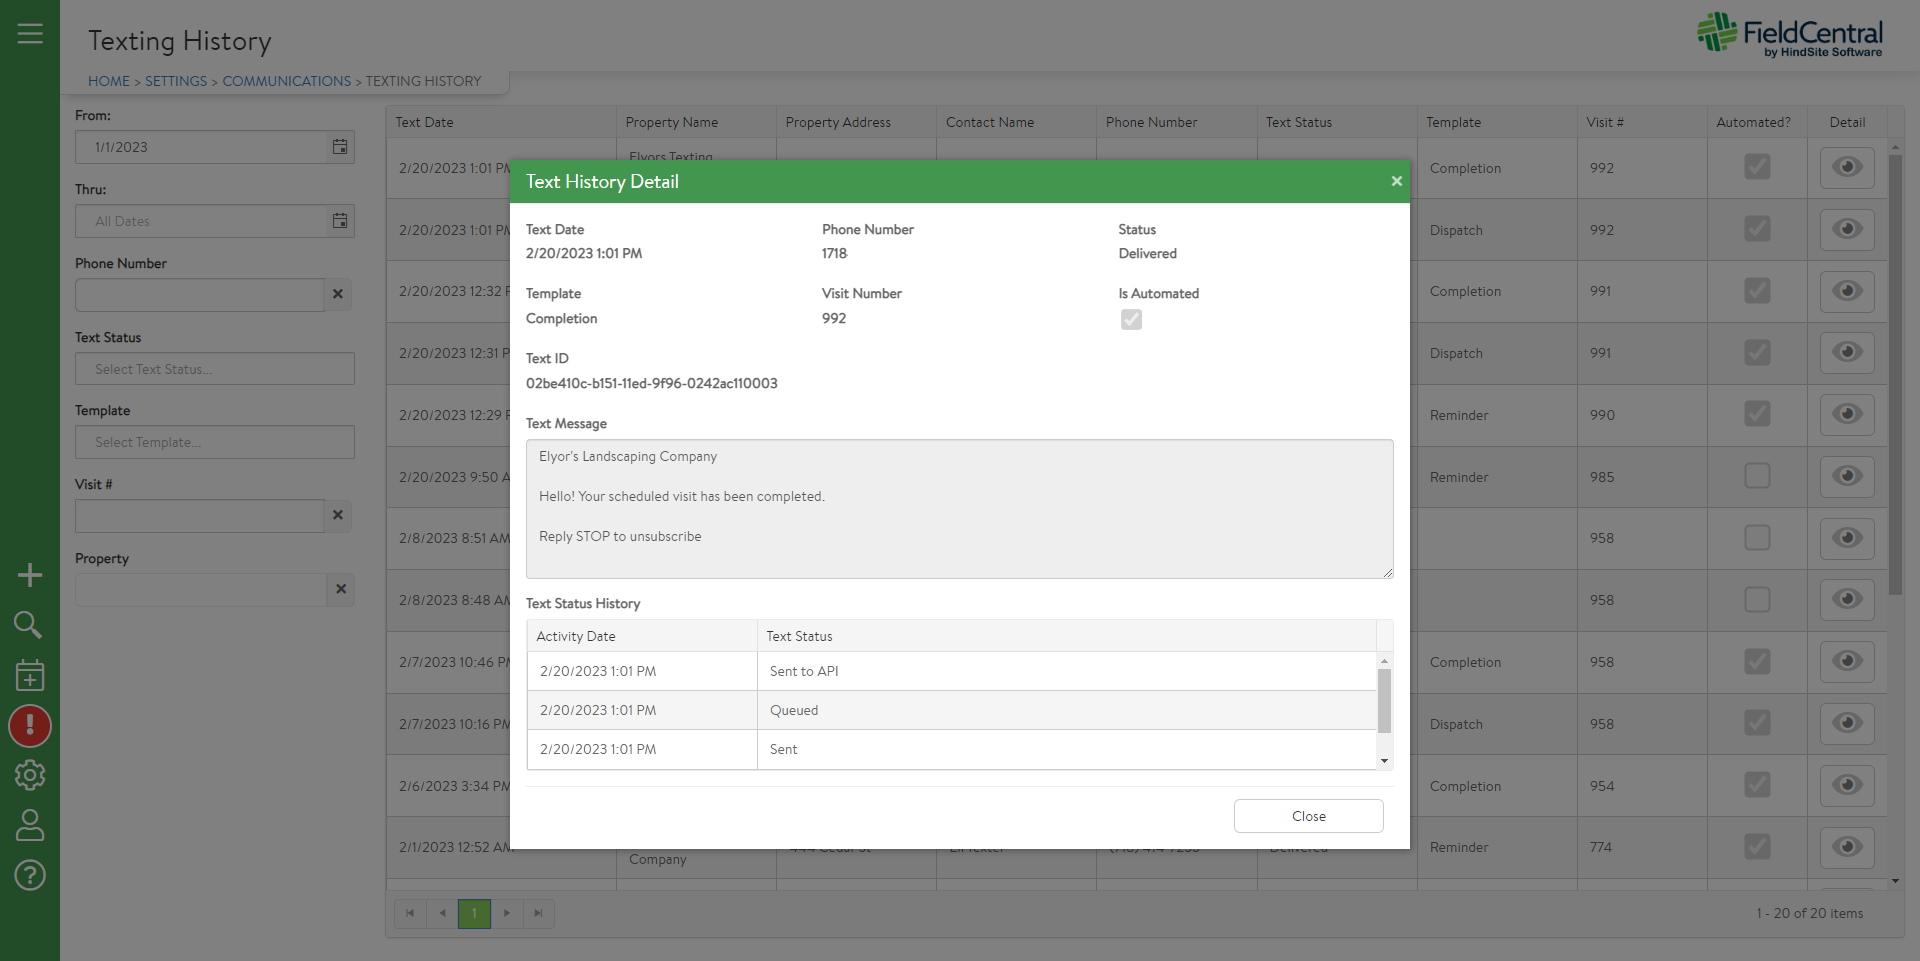
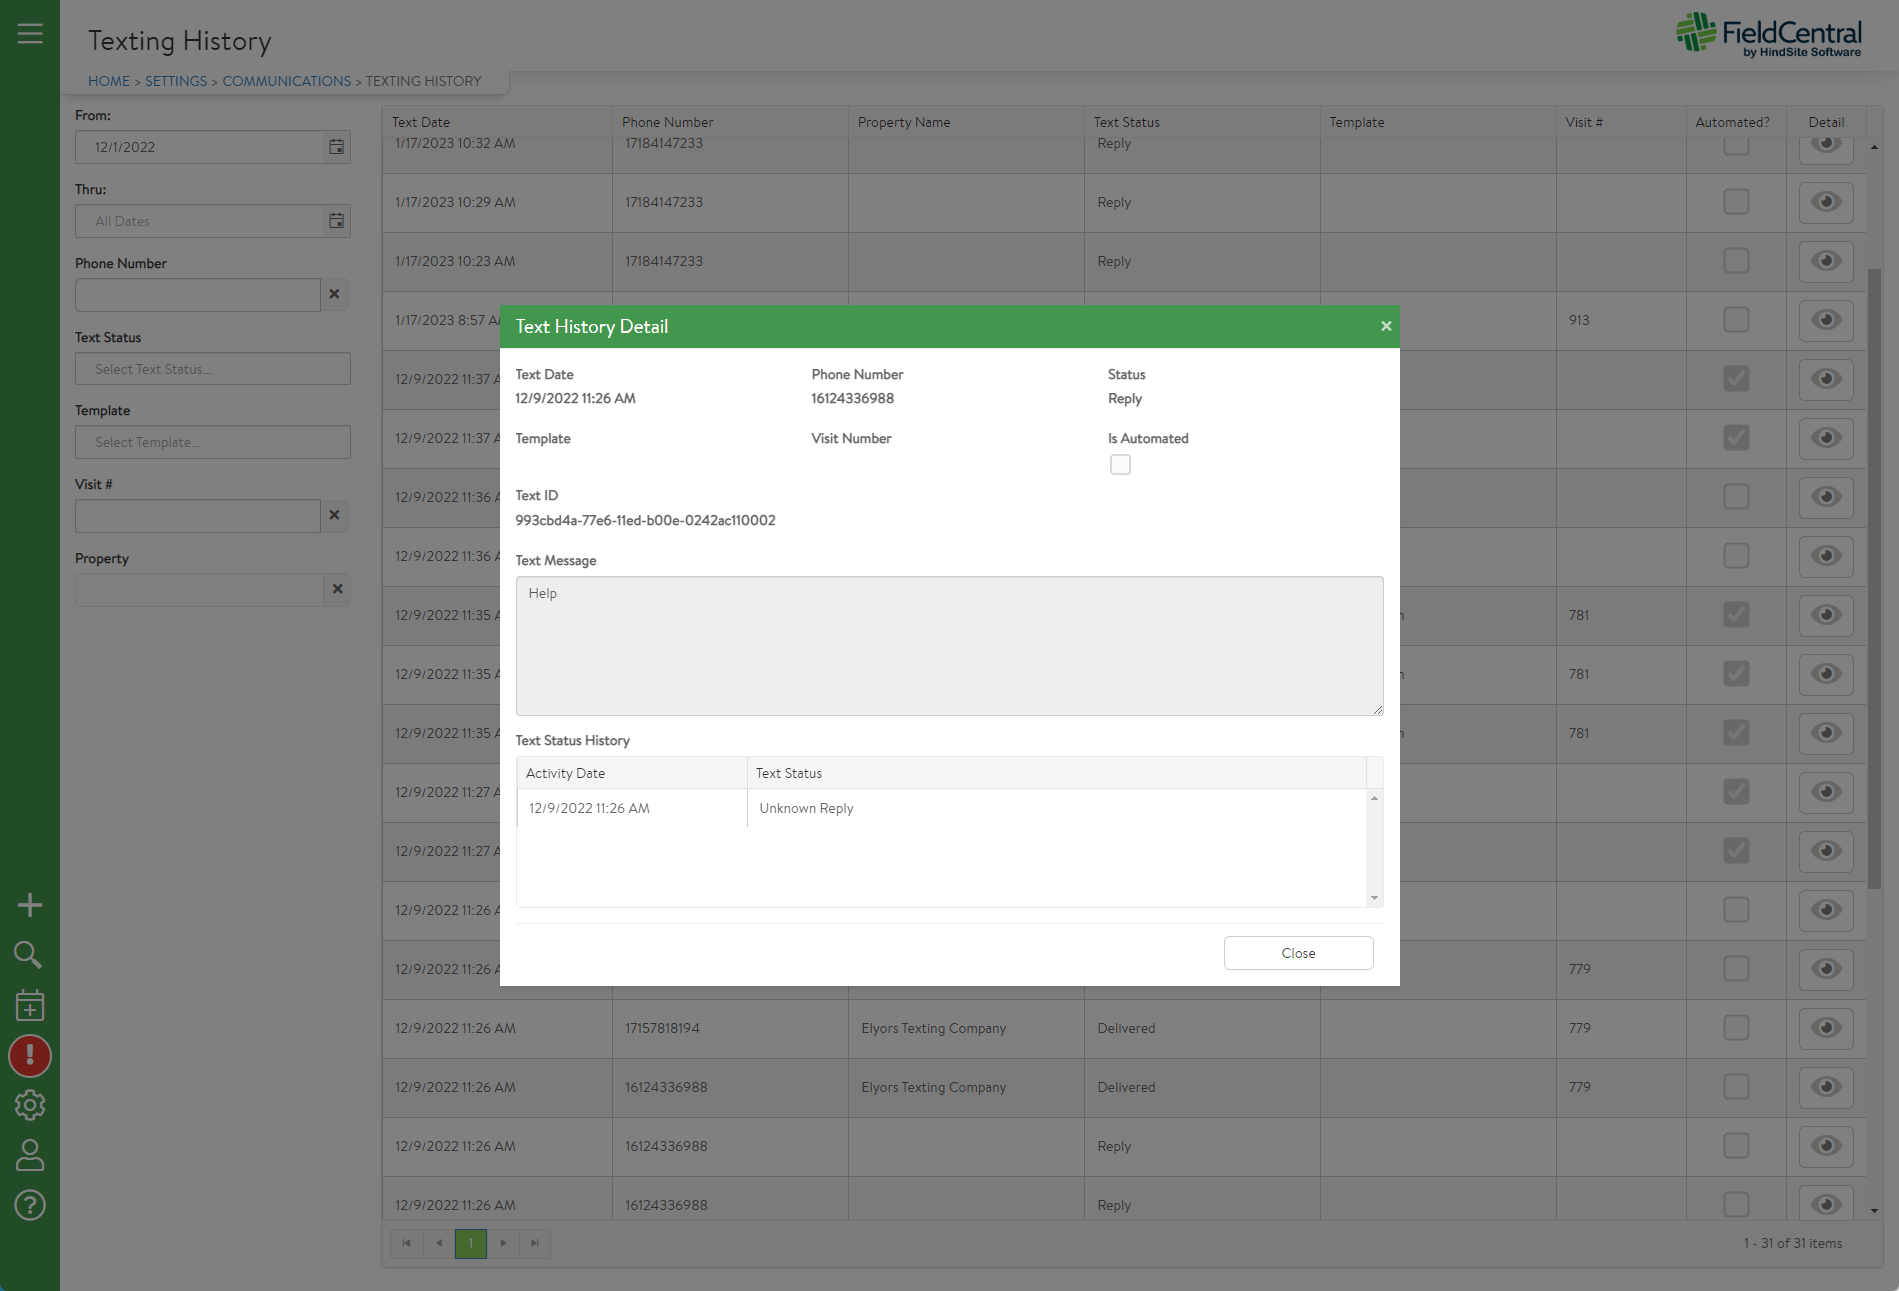
Clicking on the eye icon for the given record will show more details about that record. When clicking to view a specific Text History Detail record, users will see the following, including the actual text message sent.
The ‘Text Status History' table shows the lifecycle of the text. For manual or automatically-sent text, the typical lifecycle will show: the statuses of: ‘Sent to API’, ‘Queued’, ‘Sent’, and ‘Delivered’. The Activity Date (and time) associated with each step should be very close together in time.
For ‘Reply' records that represent instances where the recipient of the text replied to the one sent by FieldCentral, it will show the message that was sent back.
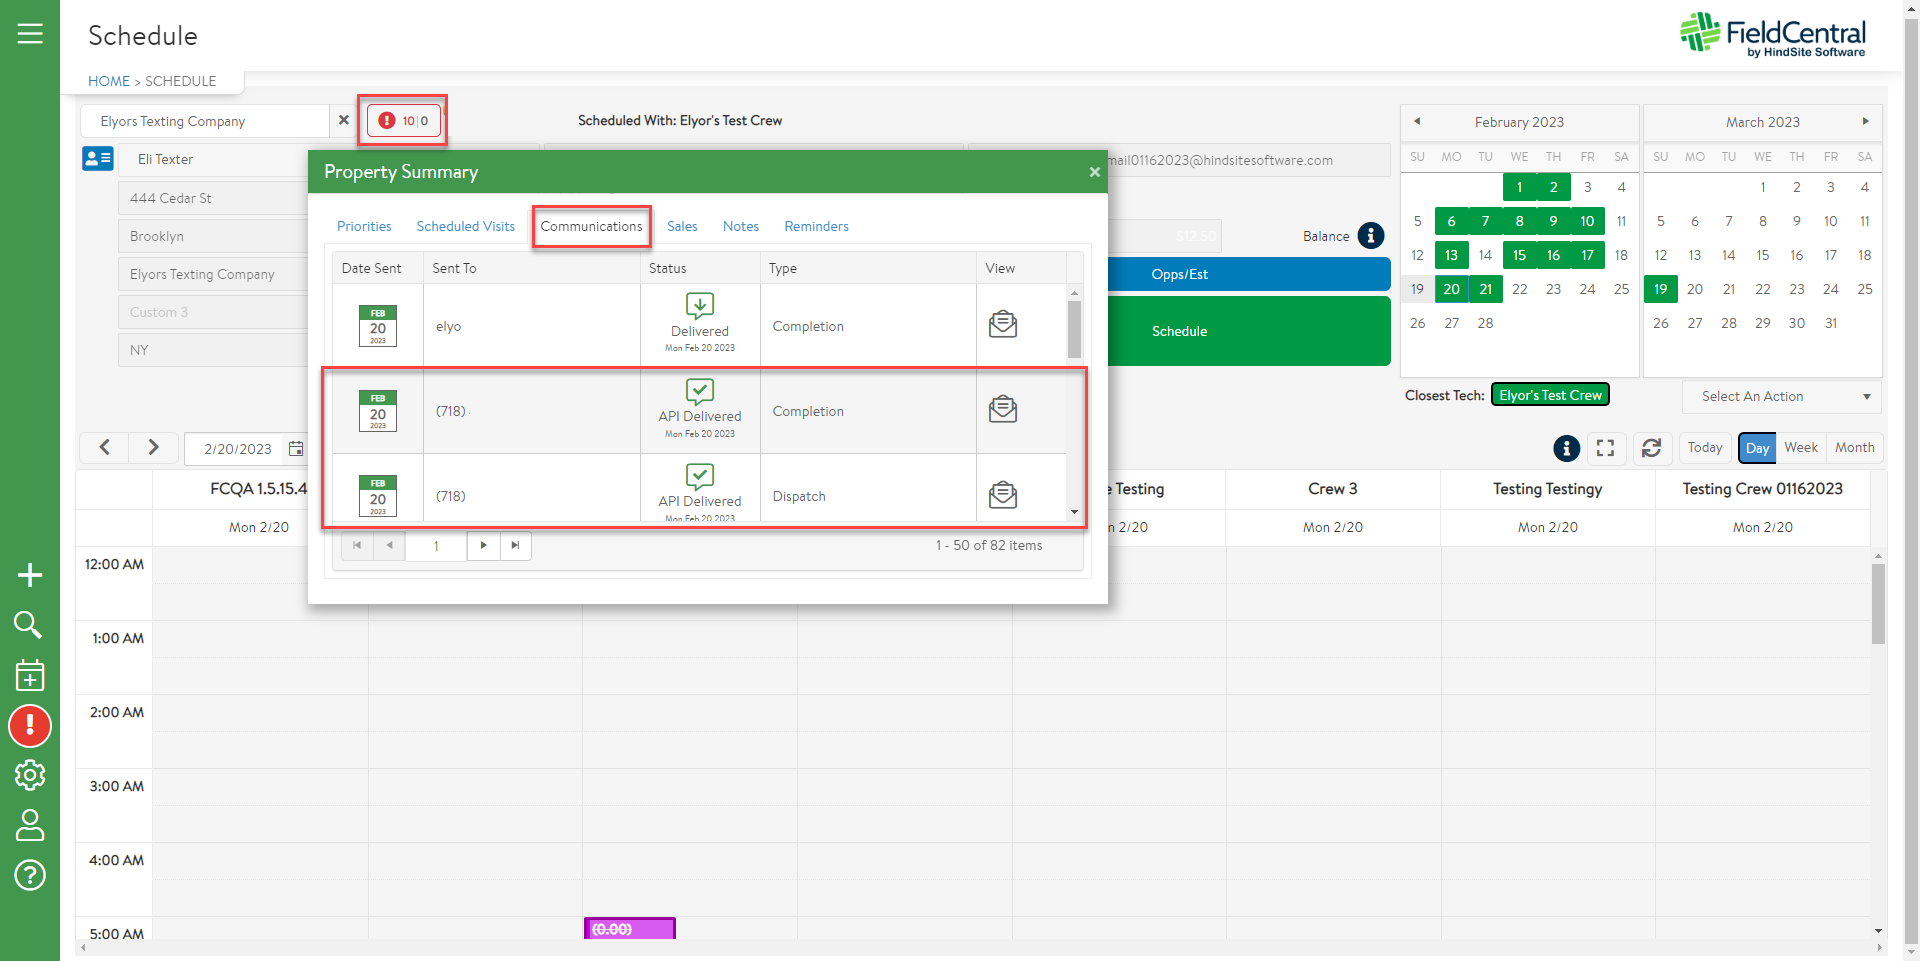
Property Summary Communication Log
Email & texting history is available in the Property Summary > Communications Tab, where each email & text sent are logged in this screen for review.